Tuesday, 30 July 2013

NAV 2013 - Reports may be difficult to read when printing over Terminal Services

NAV 2013 - Reports may be difficult to read when printing over Terminal Services


Monday, 29 July 2013

NAV issue - SQL Server - xp_ndo.dll // Enumusersids // Enumusergroups

NAV Issue - SQL Server - xp_ndo.dll // Enumusersids // Enumusergroups

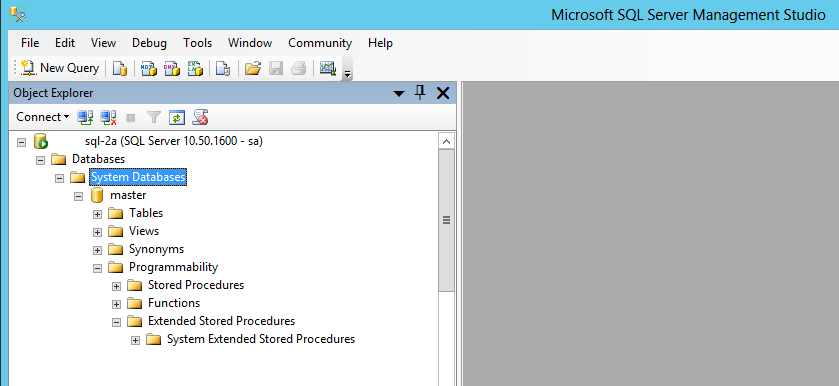
1. Open SQL Server Management Studio >> Databases >> System Databases >> Master
2. Programmability >> Extended Stored Procedures
3. Right Click >> 'New Extended Stored Procedure'


4. Locate the DLL and populate the Name field with the below: xp_ndo_enumusergroups

Note: DLL can be found in install media - "Install Media File\NAV 2009 R2\SQLDatabase\PFiles\Microsoft Dynamics NAV\60\Database\xp_ndo.dll"


5. Give the stored procedure 'Public' access with the Execute role.


6. Repeat point 4. with the relevant path & name: xp_ndo_enumuersids

Note: This is USERSids not USERids - this has caught me out a few times. 


7. Repeat point 5.


This is how it should look when you are finished:


Locking Tables

Locking Tables

Note: This affects a wide range of tables, not just 'Sales Line' table. 


This error happens when a user is running a process heavy function. For example if a user is using the Adjust Cost / Performing lots of postings / running large reports. 

Normally you will have to wait until this user has stopped running the offending process. 

To tell whether or not a use is locking a table you can do the following :

1. Log into the database through the classic client. 
2. File >> Database >> Information 


3. Click the Sessions Tab >> Then the Drill Down Arrow 


4. This will give you a list of all the users logged in at the moment. You can then look at who is ‘Blocking’ a table using the ‘Blocked’ Column. If its ticked you should be able to see the ‘Blocking User ID’ as well & from this you can determine what the user is running.


Friday, 26 July 2013

Shortcut Icon to connect to a specific Database NAV 2009 RTC / NAV 2013

Shortcut Icon to connect to a specific Database

In NAV 2013 & NAV 2009 we can give out Shortcuts in Windows different parameters in order to automatically open a default Database / Company.

Typically this can be used for Test System / Live System differentiation.


This can be done as follows:

1. Copy / Create a new Shortcut.
2. Use the below example to form your parameter string and then input this into the 'Target' field. Change the values where applicable. Remember also to change the 'Start In' value to match the program files where the program is located.

"C:\Program Files (x86)\Microsoft Dynamics NAV\70\RoleTailored Client\Microsoft.Dynamics.Nav.Client.exe" "DynamicsNAV://Middle_Tier:XXXX/Database/Company/"


Object Designer: Install Objects (.fob files)

Object Designer: Install Objects (.fob files)

1. Open the Microsoft Dynamics NAV Classic Client (SQL if applicable).
2. Open the Database
3. Shift-F12 or Tools >> Object Designer


4. File >> Import >> Choose Object from the filing system


5. In most cases you should always use the 'Replace All' function when importing the object. 


Wednesday, 24 July 2013

Posting Date is not within your range of allowed posting dates.

Posting Date is not within your range of allowed posting dates. 


This error is caused when your Posting Date Range and the Posting Date on the document you are trying to post do not correspond with each other. 


I got this error when trying to post this example Sales Order below. The Posting Date is set to the 19/01/2011 - however my posting date range is set-up for the 01/06/13..01/08/13. This means the only way I can post this Sales Order is to either: 

- Change the Posting Date on the document to be within my range.
- Change my Posting Setup to encompass the 19/01/11


You can change your posting date from these two locations: 

1. Financial Management >> Setup >> General Ledger Setup >> Allow Posting From/To 

When setting the Posting Date Range from this location these dates will be company wide - and effect every user (unless specified differently in point 2). 


2. Administration  >> Application Setup >> Users >> User Setup

In this location you can give different users specific date ranges. For example if you had one user who was only allowed to post documents from last month but another user who works in the finance department who needs to go back further, you could specify these date ranges here. 

Note: If you specify a date range From & To for a user in the User Setup table, this will take precedence over the General Ledger Setup date range. 


Tuesday, 23 July 2013

AutoSplitKey / The Line Cannot be Split

AutoSplitKey / The Line Cannot be Split

This is an error caused by trying to insert/create too many lines in between existing lines. The solve this you can either: 

1. Insert the new record at the end of the table. 
2. Delete all the entries out and start again. 

This is the explanation of why this happens: 

In this example I am using a Journal - but it will happen for any table in NAV, whether it be Schedules, Orders, Quotes, Journals etc. 

As you can see below I starte off with Line 10,000 (the default first line in NAV) and created a second line which is showing at the bottom - 20,000. I then proceeded to 'insert' a new line above the bottom line. I kept doing this and as you can see the Line No. is splitting each time a new line is inserted. At some point the divisions will hit 0 and that is when the AutoSplitKey error happens (same for 'The Line Cannot be Split' error). 


I hope this helps! 


Monday, 22 July 2013

The Reservation Entry Does Not Exist

The Reservation Entry Does Not Exist 

Reservation Entries can cause a lot of issues in NAV (all version). Sometimes the Reservation Entry table can have duplicate reservations against a single item (same Source ID - Doc No.) and as a result can cause issues due to these conflicts. The most common of these is the error 'The Reservation Entry does not Exist'. Most of the time this can be easily fixed.

Typical error:


1. Open the Microsoft Navision Classic Client (with SQL if applicable).
2. Log into the Database >> Open the relevant company.
3. Ensure you are logged in as a user with adequate permissions - ie. Super.
4. Tools >> Object Designer
5. Select the Table - 'Reservation Entry' (Typically 337).
6. Run the 'Reservation Entry' table and search for the 'Document No.' in the 'Source ID' column.
Note: You should know the Document No. as this will be the document where you are getting the error. Eg. order, invoice etc. 

7. At this point the issue may differ but most of the time you are looking for duplicates. For example - if you know you have only 1 reservation against this document (with 1 item on the document) - but two are sitting in the reservation entry table, the duplicate could be causing issues. Typically I would delete all the reservations relating to this Item / Document No and re-reserve the Item.

Please do not do this unless you are confident with filtering/running tables. This is only a general guide and is meant to help you try to find the issue yourself. Deleting entries from Tables directly is EXTREMELY Dangerous and may cause irreparable damage/loss of data. - Any doubts, don't do it! 


Friday, 19 July 2013

Create a Dataport

Create a Dataport

Dataports are used when you want to export or import a lot of information from a specific table rather than doing it manually. As a result we can process thousands of lines of information extremely quickly - which can be very useful when wanting to create spreadsheets/import journal lines/create reports. 

Today I will explain how to create a simple dataport that will both - export and import Items from the 'Item' table. 

Note: Dataports can be dangerous, if you accidentally import a file with incorrect values this could overwrite all your good data! Ensure you make backups of your database before trying any of this. Ensure this is done on your Test Database first - Never Straight to Live!!!!!! 

1. Open the Database & Company where we will be exporting/importing data. In my case I am using the default 'Cronus' database provided with the install of NAV. 
2. Ensure you are logged in as a 'Super' user.
3. Tools >> Object Designer >> Dataport >> New


4. Drill down on the 'DataItem' column and choose the relevant Table for the Dataport. In this case 'Item'.


5. Keep the Dataport Designer Open >> View >> Dataport Fields


6. Drill down and find the relevant fields we want to export / and eventually import. 

Note: Dataports do not have to be both ways, it can just be for exporting or just for importing.  


7. Once you have picked the fields press Ctrl-S to save the dataport (alternatively File >> Save). 
8. You will be prompted to give the Dataport an ID - normally you will have a set range of allowed dataports in your license. This will typically be in the 50000 range. I suggest you try 50001 as your first. Also you must name your Dataport. 


9. Once you have saved your dataport you can then run it using the Run function in the Object Designer. 
10. Firstly I will be exporting all the data from the Item Table - just so we can have a look. Note how I have selected 'Export' and chosen a path to store the .txt file. 


11. The outputted file will look something like the below.


This can also be opened in Excel - either rename the output .txt file to .csv or alternatively just select 'comma' separated when opening the file in Excel.


12. Now it is time to import some data. I have created a new workbook in Excel and ensured my columns match the order in which the dataport fields are laid out (see point 6). 


13. Save the Dataport as a CSV (save as >> select the CSV format). 
14. Select the 'Import' button on the Dataport >> Select the Import file we just created. 


15. Press OK! If all goes well your new items will be sitting in the Item List.


Now you know how to make basic dataports. I will cover this in more detail in a later post ie. Importing Journals & Validation.

Finally - I must stress that this isn't something to do unless you are 100% comfortable that any loss of data is recoverable and ALWAYS do this on your Test Database first!

Andy
Thursday, 18 July 2013

Scheduled BAT file to check if a Service has Stopped / Restart if Stopped

Scheduled BAT file to check if a Service has Stopped / Restart if Stopped

Sometimes services will stop without our control, which can cause the knock on affect of bringing your whole system to a halt. The best example of this is if our NAV Webservice or NAS Application Server Service stops this may stop other processes as a knock on effect. To get around this we can create a Scheduled task which will check to see if our specified service has stopped. If it has - it will restart it automatically for you.

If the service is in a 'Running' state the scheduled BAT file will Quit. 
If the service is in a 'Stopped' state the scheduled BAT file will Restart the service. 

1. The First thing to do is create the BAT file. This can be done by doing the following.  
- Open Notepad
- Add the below code
- Insert the relevant Service name where it says 'MyServiceName'
Note: This can be found from 'services.msc' - right click the service, Properties - Service Name.
- Save the text file as a .BAT file. >> Sales As >> Save As Type (All Files) >>Filename =  ExampleName.BAT >> Save

Note: You can test the BAT file by stopping the relevant service and 'running' the BAT file with admin privileges. 


for /F "tokens=3 delims=: " %%H in ('sc query "MyServiceName" ^| findstr "        STATE"') do (
  if /I "%%H" NEQ "RUNNING" (
   REM Put your code you want to execute here
   REM For example, the following line
   net start "MyServiceName"
  )
)
source lc. - Stack Overflow
1. We can now create a Scheduled Task >> Control Panel >> Administrative Tools >> Schedule Tasks

2. This is your task scheduler screen >> Click 'Create Task....' or right click the Task Scheduler tab and 'Create Task...' 


3. A new window will appear 'Create Task' and will default to the General Tab. Give your Schedule a name and a description. Also select the following - 
- 'Run whether user is logged on or not' 
- 'Run with highest Privileges'


4.Triggers Tab >> New... >> Choose the frequency of the schedule. I have chosen every five minutes until the end of time. >> Tick the 'Enabled' flag.


5.  Lastly you need to select the 'Actions' tab on the Create Task screen. You will need to select the .BAT file you created. This should be saved somewhere accessible - C:\bat files etc.  >> Once selected - press ok and check the Task has been created. 

Note: Using my user accounts desktop is not a good example as this will potentially be locked down to other windows users. The root of C is the best bet.  


Andy


Monday, 15 July 2013

Kill a 'hung' service / 'Stopping' Service via CMD

Kill a 'hung' service / 'Stopping' Service via CMD


Sometimes we will encounter times when a service is stuck in a 'Stopping' state, even if we right click the service to stop it, it will remain in a 'Stopping' state indefinitely. The two ways to sort this out are either a restart (which is time consuming and may interrupt your production environment) or to manually 'Kill' the service via CMD. 

1. Identify the service ID. This can be done through task manager. As we can see the MSSQLSERVER service I am choosing as an example is 'Running' but lets pretend its 'Stopping'.

We can see the PID for this is '1628' - make a note of this. 


2. Open CMD (Command Prompt). Ideally this should be run with Administrator permissions. 

Use the following command: 

taskkill /f /pid PID  


3. Then press enter! 


Andy


Friday, 12 July 2013

Delete All Users from NAV 2013 - SQL

Delete All Users from NAV 2013 - SQL


Sometimes we will need to delete all of our users from a NAV 2013 database as we may inadvertantly lock ourselves out or experiences glitches with user accounts. A quick way to delete all users from NAV 2013 is to do the following: 

1. Open SQL Server Management Studio. 
2. New Query (select the database we want to remove all the users from). 
3. Use the query below >> Hit Execute

delete
from
[dbo].[User]
delete
from
[dbo].[Access Control]
delete
from
[dbo].[User Property]

delete
from
[dbo].[Page Data Personalization]
delete from
[dbo].[User Default Style Sheet]
delete from
[dbo].[User Metadata]
delete from
[dbo].[User Personalization]

How to Create a NAV 2013 RTC Service

How to Create a NAV 2013 RTC Service

To create a NAV 2013 RTC Service you must first have the NAV 2013 client / development client installed on the middle tier server you are going to use. As a result of having the development environment installed you should have the Microsoft Dynamics NAV Administration tool available to use as well.
Also this guide is based on the prerequisite that you have already restored / created a database in the SQL Server Management Studio (or client).
For this guide we are going to use the ‘Cronus DB’ database which I have created.


The SQL Server will be called:
SQL-12
The Middle Tier will be called:
Nav2013

1.       Open the Microsoft Dynamics NAV Administration tool on your middle tier (for this example Nav2013).
2.       Right Click the below >> Add Instance


3.       Enter the following details – the ports don’t matter much at the moment, we will configure them shortly.
I would recommend using an account with elevated permissions in order to run the service. I typically wouldn’t use Administrator but for this guide I will be. A good example of this is a windows account called:

DOMAIN\SVC-NAV 


4.       Ensure the Config is pointing at the correct SQL Server and the DB name is correct:
Also note this where you would amend the ports. If the service doesn’t start correct it is most likely related to the ports. As we have so many Databases running we are running out of ports and so I am going to try and use 7015/7016/7017/7018.
Note: Please remember all these values can be edited by using the ‘Edit’ button at the bottom of the screen (see below screenshot for point 4. And Note).


5.       Now we will open the ‘Services’ function. You can do this by going to your start menu >> Run >> Services.msc (windows 7 / 8 just type this into the search box).


6.       As we can see the service has now been created:


7.       We can now try and run the Service >> Right Click >> Start


If all goes well the service will start and you can then connect to the Database using the RTC client (skip to point 9. To find out what your connections string is).

8.       If you have received an error this is probably because the ports are already being used or you have to sort out the SPNs (which I will cover on another guide).

I believe this error is due to the Ports 7016/7017/7018/7015 already being used. I will change the ports to find a combination that work.


I manually edited the Config file from the following location:


I then changed the ports to 7027 / 7028 / 7029 / 7030. This can be done in the Administration tool from section 2. But I prefer doing it this way. Remember to save the Config file after you have amended this.
Note: To debug why a service won’t start – use the Event Viewer


This is what the service should look like – it is now running correctly.


9.       Great so you’ve got to point 9 so hopefully the service starts correctly. We now need to find out what the connection string is. To do this we can use the following:

Name of the Middle Tier = nav2013

Server Instance = CronusDB

Client Services Port = 7027

nav2013:7027/CronusDB


You can now login: